Monday, October 16, 2023

Shotgun Projects- 870's

 This was a project I did a bit back.  I have 3 sons, all of which are are out of the house and one their own (at the time the youngest was about to graduate college).  For Christmas I decided they all needed a quality 'Home Defense" shotgun.  To that end I bought some police trade in 870's to 'rebuild/refurbish'.  

This is the finished product:


Now, some of you are looking at those and saying "wait a minute, you said 3 sons." Indeed I did, one of those is now mine. 

The bottom shotgun is an 870 "Magnum" made for police. It has a 20" smooth bore barrel with rifle sights.  That particular shotgun was given to me by my Father-in-Law. It had the plain parked finish and black plastic butt stock. The forend was painted black.  It looked all tactical and had fiber optic sights.  

The other 3 were agency trade ins I bought from GT Distributers. The top 2 were both early Express models.  Those early models were Remington's first steps down the lower price point road.  They had all the fit and finish of the regular blued steel Wingmaster, with the exception of the metal finish which was some sort of parkerized type exterior.  Those had no magazine tube dimples and were still as smooth as any Wingmaster. 

The third from the top was a real unicorn.  It is marked as a Wingmaster TB, meaning it originally started life as a "Trap Model B".  The trap models had very nice wood and beautiful blue finishes.  I contacted Remington and found the serial number dated to 1955.  By the time I found it for sale, it had come to belong to an agency and had a mix master set of parts, typical of agency weapons.  The barrel was another 20" smooth bore with rifle sights, which looking at the barrel code dated to the 80's.  The buttstock was beautiful grained walnut.  The forend was from a later 870 Wingmaster style with the fleur-dis-lise pressed checkering.  

Overall I cleaned them all, replaced all the springs made sure all of them had the "Flex-tab" conversions done.  Interestingly the Trap model had a standard shell lifter, and none of the internal modifications to bolt parts but I couldn't get it to lock up or jam with a shell on the carrier, the problem the flex-tab was designed to fix.  The 2 guns with rifle sights got sets of tritium front and back.  The plain bead Express models got Wilson Combat ghost rings with tritium.  With the exception of the Trap model, they all got coated in Norrell's Moly-Resin.  The police model butt stock was swapped for wood and the forend stripped.  On the trap model I turned the forend down to a "corn cob" style that pretty much matches my other 1955 Wingmaster. 

It was lots of fun and the boys all really liked them.  I figure everybody needs an 870 to repel borders as needed.   Now I'm really wanting to do the same to an 1100.

Monday, December 27, 2021

Shop build part 2

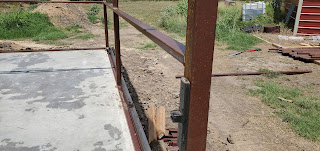
 After concrete the framing went up.  I 'designed' or I guess you could say built this with 3" columns and 3" girts or cross members on the walls.  I welded the girts between columns instead of the easier way of welding them on the outside.  This gave me something to screw to on the inside as well as the outside.


The roof purlins were simply run on top across multiple roof trusses because I wasn't going to attach anything under the roof.  After framing we skinned it with metal siding.


And finally it seemed, the Shop was in the dry.


And this is the point that, as with most projects, things went a bit of the tracks.  

I had carefully planned and budgeted for building 3 rooms inside, not including a large work area for my woodworking equipment.  One room was going to be the machine shop proper, a place for the milling machine and lathe separated from the rest of the shop in order to keep them cleaner. A second room was planned which would be where other clean type work would be done such as electrical/electronics and assembly work.  The third 'room' really wasn't going to be a room exactly since it wouldn't have a door or division but rather a semi-enclosed work area for my welders, grinders, sandblaster and other dirty work.

In addition to the carefully planned and budgeted work rooms this shop was going to have not only spray-in insulation but perhaps the greatest thing I could plan for a shop....Air conditioning.  

So, after getting it in the dry I needed to get the spray foam insulation applied to the inside of the metal before I could do anything else.  I had a friend from the Fire Department who owned a spray foam business.  He came out and had some equipment issues with his rig so it had to go to the shop.  Not a big deal and totally understandable.  A couple weeks later he came out again.  He told me as he was getting started that he didn't feel real well but he was going to get started that day and finish the next.  By the time he got everything put back together (from the shop, the didn't reassemble the hoses and gun) and sprayed one wall, he looked like bad.  That night he went to the hospital and was diagnosed with COVID.  He spent time in the hospital and when he got out he was a weak as a kitten, and was that way for months.  He was one of several in our department that were exposed and caught the COVID virus and had lasting issues.  My project was on hold


Wednesday, December 22, 2021

The Shop build part 1


I thought I would kind of start at the beginning.  This is where the shop was to be built. That is a 12x16 storage shed I built to hold our 'stuff'.  It had been a few years and was in not the greatest shape.  


It had to go


I used my brothers skid steer to push it back out of the way.  

After that I used the skid steer and my tractor to build a 'pad' for the foundation.  I had plenty of places to get dirt on my property, mostly from old farming terraces that had been put in years ago that were now in the yard and in the way.  It's kind of hard to see in the above photos, but the ground is sloping toward the woods in back.  We brought in dirt, spread it out and packed it down with the skid steer. Then I would use my tractor with the tiller to till the entire pad, then pack it again with the skid steer.  We did this in 'lifts' of about 3-4 inches at a time.


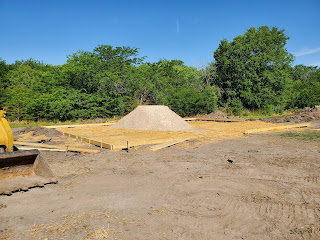
Once we got the pad pretty level, I built the forms for the slab with the help of my youngest son who was home from college for the summer.  We set up forms then brought in cushion sand to get the pad  perfectly level and ready (almost) to pour concrete.


Before pouring concrete, I had to bring electricity and water to the shop. Once that was done, I hired a crew to come do the pour.


Tuesday, August 11, 2020

More work on the shop

More work on the shop:


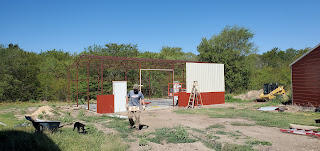
The framing is mostly done, still need to weld the purlins on the roof trusses.  Hoping to get purlins as well as metal siding and roof done this week.  It takes a while when you're doing it yourself on days off.


Wednesday, July 29, 2020

I've always wanted one, now I have two


5.56 on top, 9mm on bottom (using Glock magazines of course)


The 9mm is an SBR and will soon be getting a suppressor and shorter barrel.


Friday, July 24, 2020

Time for a new Fixit Shop


It's been a while, and it seems it's time for a  new Fixit Shop.  I've started cleaning up around here, if anyone is still around you may notice a few changes here and there.  I'm also actually building a new Fixit Shop in meat space as well. 

A few years ago the wife and I bought some land and had a plan.  The immediate plan at the time was to build a "Barndominium" house to move into fairly quickly, and then to plan and build a 'real' house in a couple of years.  Well, we were at the point where the kids getting older, the oldest had been out on his own for a few years, middle son was about to leave for college and middle son would follow in a couple years.  We decided to stay in the Barnodinium. 

However, the original plan had been to build a house and then take in much of the living space and convert it to shop space.  Since we weren't moving, shop space never happened.  The growing mound of clutter and additional tools have made it very hard to actually do anything.  So, I am now building a detached shop building.  I'm excited.


Just a couple of days ago I got the concrete poured.  Since I have Champagne taste and a beer budget, I'm putting a lot of sweat equity into this.  Basically I'm doing 90% of the building myself, with he help of the youngest son who is now home from college for the summer.  We did the dirt work to build up the pad, and then set forms and leveled the interior.  I had a crew come in to set the steel and pour the concrete because that is just not a 1 or 2 man job and you can't do it at your own pace.

With the concrete done and curing, I now have a load of steel to do the framework.  This will be a 30x40 building with 12 foot sidewalls.  I need a 10 foot tall door to be able to get a tractor in, which requires the 12' walls.  The plan is for metal R-panel siding and spray foam insulation.  This would be a lot more fun if it wasn't already so hot.  

My plan is to keep a build log here, and maybe show some 'how-to' or at least 'how-I-did-it" in case anyone else is a glutton for punishment and want's to do their own.  If anyone has questions or comments, they are welcome.  I'm turning comments on with the hope I don't get spammed or no one gets stupid.